Eave-Mounted CCTV: A Step-by-Step Guide to Dummy Camera Installation
Mounting dummy cameras under eaves is a strategic security boost, leveraging realistic CCTV appearan…….
Mounting dummy cameras under eaves is a strategic security boost, leveraging realistic CCTV appearances to deter intruders. It requires careful geometry consideration, using specialized brackets for secure installation without compromising gutters or integrity. Prepare by inspecting roof damage, considering weight load, and ensuring proper ventilation and drainage. The process involves selecting compatible cameras, measuring spacing, testing visibility, and securing brackets with strong adhesives, creating a discrete yet effective security system.
“Enhance your home security with exterior fake CCTV mounting—a discreet, game-changing solution. This comprehensive guide delves into the art of installing dummy cameras under eaves, a strategic approach to deterring potential intruders. From understanding the benefits of this method to preparing your roof for installation, we cover it all.
Learn the step-by-step process, from attaching the cameras securely to testing and positioning them for optimal visibility. Discover how mounting dummy cameras under eaves can transform your property’s security landscape.”
- Understanding Mounting Dummy Cameras Under Eaves
- Preparing Your Roof for Installation
- Step-by-Step Guide: Attaching the Cameras
- Testing and Positioning for Optimal Visibility
Understanding Mounting Dummy Cameras Under Eaves
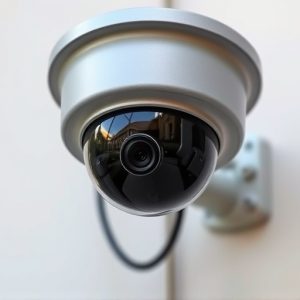
Mounting dummy cameras under eaves is a common practice for enhancing security and deterring potential intruders. These hidden cameras mimic real CCTV systems, providing a powerful visual deterrent without the need for complex wiring or installation. Understanding the specific challenges and requirements of this mounting process is crucial.
When installing dummy cameras under eaves, it’s essential to consider the unique geometry of these areas, often characterized by narrow spaces and varying angles. Proper placement ensures optimal visibility while maintaining an aesthetically pleasing appearance. The use of specialized brackets and mounting hardware designed for eaves can facilitate a secure and discreet installation, allowing the camera to capture clear footage without obstructing gutters or causing damage to the structure.
Preparing Your Roof for Installation
Before mounting any security cameras, it’s crucial to prepare your roof and ensure a secure installation. If you plan to install dummy or fake CCTV cameras under eaves, start by inspecting your roof for any damage or vulnerabilities. Repair or replace any missing or damaged shingles to create a sturdy base for the mounting hardware. Keep in mind that the location under the eaves provides a strategic yet hidden spot for security cameras, making it ideal for deterring potential intruders.
Next, consider the weight and wind load capacity of your roof structure. Ensure that the mounting brackets you choose are designed to support the weight of the camera systems. Proper ventilation and drainage should also be taken into account to prevent any water damage or buildup around the mounted cameras. By addressing these preparation steps, you’ll create a solid foundation for the installation of your exterior fake CCTV cameras under the eaves.
Step-by-Step Guide: Attaching the Cameras
Attaching cameras for a fake CCTV system under eaves is a straightforward process, offering a discreet and effective security solution. Begin by ensuring your mounting dummy cameras are compatible with your chosen location. Measure the distance between each camera and the edge of the eaves to ensure proper spacing, allowing for unobstructed lines of sight. Next, clean the area thoroughly, removing any dirt or debris that could compromise adhesion. Apply a strong adhesive suitable for outdoor use along the back of each camera. Press firmly against the underside of the eave, aligning the cameras precisely with your initial measurements. Allow adequate curing time as specified by the manufacturer before activating your system. This simple step-by-step process enables you to securely install dummy cameras under eaves, enhancing the overall security posture of your property without drawing unnecessary attention.
Testing and Positioning for Optimal Visibility
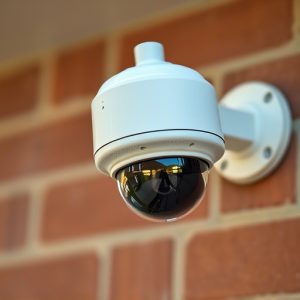
When mounting dummy cameras under eaves, it’s crucial to test and position them strategically for optimal visibility. Begin by ensuring the camera has a clear line of sight to the areas you wish to monitor. Positioning is key; mount the camera at a height that provides an unobstructed view, avoiding any obstructions like tree branches or nearby structures. Adjust the angle carefully to capture the desired field of view without capturing unwanted areas.
Testing before final installation is essential. Use a test feed to verify image quality and clarity. Check for any signs of distortion or blind spots in the camera’s field of vision. Once satisfied, securely fasten the mounting bracket, ensuring it’s sturdy and aligned correctly. This meticulous positioning will guarantee that your dummy cameras serve their intended purpose effectively, providing clear and comprehensive surveillance.
Mounting dummy cameras under eaves is a straightforward process that significantly enhances home security. By understanding the proper techniques outlined in this article, such as preparing your roof and testing for optimal visibility, you can effectively utilize mounting dummy cameras to deter potential intruders. Remember, while these cameras serve as a deterrent, actual CCTV systems should be installed by professionals for comprehensive protection.